Tuesday, April 24, 2012

Cookbook Reviews


I really enjoy cooking.  I’m definitely not a “great” cook (yet) but I like to think that I can throw a meal together.  I also like cookbooks and I am always on the lookout for new recipes to try.

So I’ve decided to embark on a rather daunting journey.  The task that I have set for myself is to try my hand at reviewing a few cookbooks! (This will also be my first blog SERIES!  Woo hoo!!) Here will be my criteria:

1.  Practicality of recipes-- While it’s nice to dream about a perfectly stocked kitchen with every baking tool I may need at my fingertips, let’s get real.  I live in a rental.  I’m on a budget.  So I will be basing my review on how practical the recipes really are.

2.  Ease-- I would love to be able to devote whole days to whipping up fabulous delicacies in my rental kitchen.  But again...not so realistic.  I’m on a time crunch here, people!

3.  Other cookbook-y stuff-  If you read the intro to your cookbooks, usually they contain great tips and hints for cooking:  Ingredient substitutions, hardware substitutions, tips for special techniques, etc.  That’s one of my favorite parts about cookbooks.  I learn so much from the intros!

4.  My whims- Anything else I feel is pertinent to share with my adoring fan base.


Stay tuned for my first review!

Saturday, April 21, 2012

3 Favorite At Home Beauty Treatments

Have you ever had one of those weeks where you have just been....uninspired?  I have.  This week, to be precise.  The recipes I picked this week were uninspiring and I ended up not even making dinner three nights...I didn’t have time to DIY anything because of work...and even my workouts were kind of haphazard this week.

I was making the move into an uninspiring weekend.  I needed a pick-me-up, stat.  I hadn’t done my favorite at home beauty treatments in a while so I busted them out of the pantry.  These three treatments work better than anything I’ve ever bought in the store and I have all the ingredients for them already in my kitchen.  No running to the store for specialty products.

For my hair:
equal parts olive oil and apple cider vinegar
honey

Whisk the ingredients together in a small bowl.  Apply to hair (hair should be soaked), clip hair up and out of the way, and let it set for about half an hour.  Wash out (because of the oil I find just a rinse isn’t sufficient.  Unless you want to go the rest of your day with super greasy hair).  Oh, and you WILL smell like an easter egg while doing this one.


I wish I could get a picture that does justice to the before and after of my hair when I do this.  I describe it to friends as a “hair transplant.”  It is soft, shiny, and has a TON of body.  After the very first time I did this, it was even a slightly different color!  The results last about a week.

For my skin:
equal parts honey and cinnamon
Bonus of this one-- it also tastes delicious!  Feel free to lick your face while this one is working it’s magic.

Mix the honey and cinnamon into a thick paste.  Shmear on your face.  Let it sit for about 20 minutes, rinse off.


I get this crazy red patch on my right cheek.  It’s not acne and it’s never truly bothered me enough to go to a dermatologist to find out what it is.  Just weird.  This mask SIGNIFICANTLY lightens that patch.  It also makes the rest of my skin look clearer, firmer, and gives it a little bit of a glow.  The honey is antiseptic and the cinnamon is an anti inflammatory.  So there ya go.  The results of this one also last about a week.


For my skin 2:
equal parts milk and unflavored gelatin

This makes pore strips like you can buy in a box.  My problem with the boxed ones is that I never feel like I can really get them into the nooks and crannies of my face.  Here is a video that gives the instructions way more clearly than I could type them out:


The thing that she doesn’t say in the video is that this one STINKS.  Oh my goodness...and your putting it on your FACE.  Hold your breath.  But it really does work. Trial-and-error tip:  don’t mess with it too much.  Paint it on your face and go.  If you try to blob it around with the brush too much it clumps up and doesn’t work.  Also, she tells you in the video to use a tablespoon of gelatin and a tablespoon of milk.  Unless you are going to paint your whole face with the stuff, that is WAY too much.  I recommend scaling it back.  I usually use ½ tbl of both ingredients.

I would not recommend doing the “pore strips” and the “mask” on the same day.  The mask is pretty exfoliating and the strips can be a little hard on your skin, too.  If you have sensitive skin, combining them may be too much for your poor face.

Do you have any at home beauty regimens that work for you?  Please share!

Monday, April 16, 2012

How To Eat Organic On a Budget

The other day, I made a salad for lunch that involved lettuce and cauliflower with some chopped apple for sweetness.  Pretty healthy, right?  Well...calorically speaking it was.  But, had not most of the ingredients been organic, I would have ingested 109 different hazardous chemicals.  Chemicals that, when transported in a tanker truck, get the privilege of being marked with this symbol:


Those chemicals could have gone into my body.

The USDA found 42 recurring pesticide residues on the average apple.  16 different pesticide residues were found on the average cauliflower.  Pesticide residues on the average head of lettuce numbered 51.  (http://www.whatsonmyfood.org/index.jsp)  These chemical residues include known and suspected carcinogens, known and suspected hormone disrupters, neurotoxins, and reproductive toxins.

“BUT E!!!!  ORGANIC FOOD IS SOOOOO MUCH MORE EXPENSIVE,”  you whine.  First, remember that organic food is the cost of real food.  The $1 hamburger at McRestaurant is NOT real food...therefore it costs less than a real hamburger does.  This post will outline some tips for buying organic on a budget.  Remember, I am a poor school marm and Z has a less than reliable work schedule.  But we manage to do it WITH money left over...so can you.


Step 1:  Cut the Crap
Part of the idea of eating organic is eating less processed food.  The more processed an item is, the more chemicals are in it.  The closer an item is to its natural state, the better it will be for you.  So stop eating garbage.

Nom Nom Nom!  I love pink slime!

When you cut processed chips, ice cream, cookies, donuts, fake meat, soda, juice, etc out of your grocery bill you will be amazed at how much money you have left over for good food.  For example:  An average container of “fruit juice” at my grocery store is somewhere in the $2-$4 range.  Turn it over and look at the label and you see chemical after chemical after chemical.  Even if it doesn’t have high fructose corn syrup in it, the first ingredient is probably water.  So rather than paying $4 for what is essentially water...we drink...WATER.  It’s FREE.  Let’s say you buy two jugs of juice a week.  That could be $8.  That’s enough to buy 4 organic peppers for the beginnings of a delicious stuffed pepper recipe for dinner one night.

And the same principle applies to all of the processed food filling your cart.  Why buy a box of 100 calorie fake food snacks when you can buy a bag of organic celery?  (And the celery is going to be less than 100 cal/serving anyway)

Do you or I have the money to just ADD organic food to our grocery bill?  Probably not.  But look at your receipt.  How can you move around the existing dollars and cents to make room for more organics?

Step 2:  Know your Stuff
I do not buy ALL organic food.  Now that really is too expensive.  But our friends in cyberspace have come up with a two lists for those of us who don’t have tons of extra cash lying around:

The Dirty Dozen:
  • Peaches
  • Apples
  • Sweet Bell Peppers
  • Celery
  • Nectarines
  • Strawberries
  • Cherries
  • Pears
  • Grapes (Imported)
  • Spinach
  • Lettuce
  • Potatoes
These are the foods that have the most pesticide residue.  And so these are the foods that I try to ALWAYS buy organic.

The Clean 15
  • onions
  • avocados
  • sweet corn
  • pineapples
  • mango
  • sweet peas
  • asparagus
  • kiwi fruit
  • cabbage
  • eggplant
  • cantaloupe
  • watermelon
  • grapefruit
  • sweet potatoes
  • sweet onions
These fifteen foods have the lowest traces of pesticide residue, so with these I skip the organics and just buy conventional produce.

Also in the “know your stuff” category:  Know the difference between an organic label and an all natural label.  A USDA organic label means that product follows USDA organic regulations:  No sewage sludge, irradiation, or gmo in any stage of production and no antibiotics or growth hormones were given to livestock.  Livestock were also fed 100% organic feed.


A “all natural” label means squat.  It’s a marketing technique.  There is no regulation of “all natural” and you might as well save a few bucks and buy the exact same product that doesn’t say “all natural” on it.

Step 3:  Know your Limitations
After you follow step one (cutting the crap) know what you realistically can and can’t afford and go as organic as possible.  Two examples of this from my own shopping cart include meat and milk.

Grass fed organic meat is SUPER expensive where we live.  We realistically can’t afford beef that has not been given hormones and antibiotics and was slaughtered while covered with its own dung.  So we just eat less of it.  We limit our meat consumption (much to Z’s dismay) to about 3 times a week.  I also have the grinder attachment for my stand mixer.  If we want hamburger, I will buy one cut of meat and grind it myself.  Yes, it is probably still chock full of hormones and antibiotics.  But at least I know it all came from one cow, reducing the risk of cross contamination.  It is also all meat...and not pink slime.

Organic milk is another thing we realistically can’t afford.  A half gallon of organic is the same price as a gallon of conventional milk.  I have found one brand, however, of conventional milk in my regular grocery store that claims to only use milk that comes from cows not treated with rBHT (the growth hormone).  I figure that’s the best I can do right now.

What you can afford and what you can’t depends on your income, priorities, and where you live.  Maybe you live next to a farm with grass fed beef that you can get on the cheap from the farmer but organic strawberries are $3 more in the grocery store.  Do what works for you.

Step 4:  Don’t make yourself crazy

Every organic apple you eat is 42 less chemicals that you putting into your body.  If you can afford the apples one week, but not the next, don’t go crazy over it.  Every little bit will help.

And think of it this way...the money you are spending now on organics is money you are saving on future cancer treatments, fertility treatments, and thyroid medication.

Good luck!  Happy shopping.

Friday, April 13, 2012

Angel Food Cake How-To and a Recipe


My parents own a small hobby farm.  They currently have a few sheep, a llama, and some chickens (their rotating cast of characters has also included, at various points in my upbringing, goats, ducks, geese, rabbits...but never a horse.  No.  Never a horse).  One of the great things about visiting with my family is that we get farm fresh, cage free eggs every time we go.  And I don’t just mean while we are visiting.  We get sent home with gratis farm fresh, cage free eggs.

We have had the great pleasure of seeing my family more often in the past few weeks than normally happens.  Because of this...we have an overabundance of eggs.


Whoa...eggs!
Luckily, one of Z’s favorite desserts is angel food cake.  Store bought angel food just isn’t the same as the real deal so I took the opportunity to break a few eggs and make an omlet a cake from scratch.  It was gone in two days.

I found a recipe that substitutes part of the refined sugar with honey.  And angel food cake is already fat free, so I didn’t feel guilty that it disappeared so fast.  Here are some tips when making angel food cake from scratch.  It can be a bit temperamental. (See post re: why I don’t bake.)  The full recipe is included at the bottom of the post and can also be found here.

First and foremost, you can’t have ANY yolk in your eggs whites.  Even a speck will cause your whites not to beat right...or so I hear.  Here is the method my mother taught me for separating my yolks from my whites (I really wish I had taken a picture of this step.  Sorry):
Step 1:  Get two bowls and a large liquid measuring cup.
Step 2:  Crack the egg GENTLY into your hand over one bowl.
Step 3:  When the white has run through your fingers (looking like snot) and left behind an intact yolk, deposit yolk into second bowl.
Step 4:  Deposit yolk-free egg white into measuring cup.

Repeat ad nauseum.  It took me 14 eggs to successfully separate 1 ½ cups of egg whites.  Using this method insures that  ALL of your whites aren’t contaminated by yolk.  If a yolk happens to break and run through your fingers with the snot white, you only have to toss one egg white...rather than the previous twelve you’ve already separated.

The second important step to a successful angel food cake is knowing the difference between a soft peak and a stiff peak.  When beaten egg whites stand on your beater, but the tip curls, that is a soft peak.  When the whites stand on your beater and the tip doesn’t curl...stiff peaks!  psst....soft peaks come first in the beating process.


Last, the difference between folding and mixing:  After you have beaten your eggs, you really don’t want to lose the volume that you have achieved.  This is why the difference between folding and mixing your dry ingredients is important.  Folding is exactly what it sounds like.  You sprinkle the dry ingredients on top, stick your spatula to the bottom of the bowl, and scoop some of the bottom egg whites to the top in a kind of folding motion.  Mixing is a more vigorous stirring motions and will cause the egg whites to deflate a little.  True confessions time:  Here is where I kind of messed up on my angel food cake.  My dry ingredients weren’t folding to my satisfaction and I got a little impatient.  I may have been a little indelicate towards the end of the folding process.  The result was a cake more on the dense side.  Still delish...just not quite the desired texture of an angel food cake.


Good luck with your cake!  As promised, here is the recipe for Honey Angel Food Cake.  It has a great flavor from the honey-- not overwhelmingly honey flavored, but a slightly deeper flavor than regular Angel Food Cake.  We ate it with thawed frozen strawberries and raspberries.

1 ½ cups egg whites
1 ½  cups sifted powdered sugar
1 cup sifted cake flour or sifted all-purpose flour
1 cup sifted all purpose flour
1 ½ tsp cream of tartar
1 tsp vanilla
¼ cup honey
½ cup granulated sugar

1.  Allow egg whites to come to room temperature.  Meanwhile, sift powdered sugar and flour together.  Set aside.
2.  Add cream of tartar and vanilla to egg whites.  Beat with an electric mixer until soft peaks form.  Gradually add honey in a thin stream. Continue beating.  Add granulated sugar slowly.  Beat until stiff peaks form.
3.  Sift one fourth of the powdered sugar mixture over beaten egg whites.  Fold in gently.  Repeat, folding in the mixture by fourths.  Pour into an ungreased 9 or 10 inch tube pan.  Gently cut through batter to remove air pockets.
4.  Bake on the lowest rack in a 350 degree oven for 40-45 minutes, or until the top springs back when lightly touched.  Immediately invert cake and cool completely in the pan.  Loosen cake from pan and remove.


So now the big question:  What do I do with the yolks???

Tuesday, April 10, 2012

Honey-Do

In “our house of dreams” (re: Anne Shirley to Gilbert Blythe in Anne of Windy Poplars) we have some sort of outdoor space for Z to do manly things.  His tools are currently stuck in the hallway closet, which is not conducive to most manly activities.  


This outdoor space might be a shed.  It might be a garage.  We won’t know until we find “our house of dreams.”  One thing I do know:  I’ve got a Honey-Do list a mile long just waiting for Z when we find it!! The following is a list of things Z is going to make for me...he just doesn’t know it yet.


This one assumes that our dream home also includes some outdoor entertaining space.  But is this not genius? A wall mounted cabinet/shelf thing that you can fold down when you are using it and fold up when you are not!  Genius, I tell you!  This is for sale here but it's totally a DIY.


Serena at The Farm Chicks included this lovely idea in her kitchen remodel.  It's a cutting board with a hole over the trash can!  No more walking all the way across the kitchen with a balancing act of kitchen scraps, only to have half of the scraps go over the sides when you get to the trash can anyway.  You may call this idea lazy.  I call it genius.


This idea for storing cutting boards and cooking sheets uses tension rods and comes from Martha Stewart's design blog.  Now if it just uses tension rods, why do I need Z to make it for me?  Good question, glad you asked.  In our town house, I don't have a pantry as shown in the picture.  I really can't complain about the storage I do have in the kitchen...it's a lot given that we are in a rental.  But I tried this idea and, unfortunately, over every cabinet is a drawer.  Which means there is nothing for the top of the tension rod to "tense" against.  So my idea is a free standing doo-dad with the rods secured in some sort of a base.  Z!!!  I NEED YOU!!!


This last one may need to happen sooner rather than later.  Our shoe "corner" by the door is a hot mess.  This beauty is from The Container Store and I've seen other ones like it in other stores.  But  I have a hard time paying $30 or $40 for this when it's so obviously an easy DIY.


*Sigh...* those are just a few things on Z's honey-do list.  Guess I'll keep dreaming for now.

Friday, April 6, 2012

Hard Work. Dedication. Part 2

Or...why I eat clean and green.


As I thought about my last post, I realized I have soo much more to say about my health/fitness journey.  So here is why I eat clean and green--an important component in how I got to where I am today.

I mentioned at the end of my last post that part of my journey has been INCREDIBLY frustrating.  I would specifically categorize the first 8 months as “Banging My Head Against A Wall.”  I had started p90x and was going to Zumba twice a week on top of it.  I was changing my eating habits to include more fruits and vegetables and less refined sugars.  But I still wasn’t seeing the results I felt like I should be seeing.

Then, three things happened ALMOST simultaneously.  First, I read Jillian Michaels Master Your Metabolism on recommendation from a friend.

I went into it expecting a diet book.  It is SOOO much more than that.  Jillian explains how the non-nutrients in food actually mess with our metabolism.  She gets very scienc-y in the book and I actually skipped a lot of the technical stuff, but the gist is this:  Processed and non-organic foods (and even your household items) have chemicals in them.  These chemicals get into your body and your endocrine system (the system that regulates all the hormones).  Your endocrine system doesn’t know what to do with these chemicals and so starts producing EXTRA hormones to reach a level of homeostasis.  These extra hormones do everything from making you hungrier to keeping you up at night, from making you bloated to NOT BEING ABLE TO LOSE FAT CELLS.


Almost as soon as I finished the book, I happened to catch the documentary Food, Inc on television.  If you have never seen it, STOP READING THIS BLOG POST AND GO WATCH IT.  (Then come back and finish reading, please.)  Food, Inc talks about the effects of industrialization on our food supply.  What do big companies have to do to food to make it shelf stable, to make it cheap enough that they will turn a profit, to make it so that the American supermarket has no seasons?  They add chemicals.  They produce it in such a way that it breeds foodborne illness and that it barely resembles food at the end of the conveyor belt.


The NEXT morning (no lie) I woke up to a recall in the newspaper of ground turkey because of traces of salmonella.

Ok, so to bring it all full circle...these three things in conjunction with one another made me decide to go as green and clean as our budget will allow.  And I immediately started losing weight.  Let me be crystal clear:  Switching from non-organic to organic food products was the only thing I changed.  Within a week I started seeing the results from my workouts that I felt I should have been seeing all along.

Other side effects from making the switch:  My hair immediately started growing faster and thicker.  My skin cleared up and looks firmer.  My overall general mental health is more stable.  Some people might argue that these side effects just could have been from eating more fruits and vegetables and exercising more.  BUT I WAS ALREADY DOING THOSE THINGS.  These effects came from switching to organic foods.

(Yeah, Yeah....eating organic is better for the planet.  Eco-friendly.  All that.  But let’s be honest here, my decision to switch was PURELY selfish!!!)

I know a lot of people say they can’t afford organic.  It is too expensive.  Soon, I will post about how we buy organic on a budget (keep checking back!).  Remember, we are on one teacher’s salary and one day-to-day substitute teacher’s salary.  And we do it.  It is possible to eat organic without breaking the bank.  And the trade offs are soooooooo worth it.

Wednesday, April 4, 2012

Hard Work. Dedication.

I realized in my “bio” it says that I am interested in all things fitness and I haven’t made a single post yet about fitness!!!  Silly me...so here’s the story of how I went from where I was to where I am.  All on my own (I’m kind of ridiculously proud of that point.  No trainer.  No weight loss plan membership.  Not even a gym membership.  Just me.  And the support of my darling husband).


Where I was:  Sedentary
I have never been an athlete by ANY stretch of the imagination.  In fact, I tended to kind of avoid things that would make me sweat.  And I also believed 100% that unless the “workout” felt like “work,” it was ineffective.

In college I was what is known as “skinny fat.”  I wasn’t overweight, but I wasn’t fit.  Then we moved to the heart disease belt, also known as The South.  Think:  Paula Deen.  We were in a new city, new habits, new routines.  Over the two years we were there, I gained 30 pounds.  I still wasn’t morbidly obese, but I was heavier and more out-of-shape than I’d ever been.  I’m not very tall (about 5’3) so that 30 pounds did not have a lot of room to spread out.

Then we moved back to The North.  This was right around the time the P90x craze hit.  So we got the system and I tried it.  I made it all the way through the program!  Did I get the crazy results that are on the infomercial?  Of course not.  BUT...I credit the program with changing my attitude about fitness and working out.  About halfway through the program a switch in my brain flipped and I started to WANT to be active.

Once I finished p90x, I started Couch to 5K.  Now, let me repeat what I said earlier...I am NOT an athlete, especially not a runner (I was the “couch” when I started).  But C25K changed me. It is a graduated program that steps your time spent running up and your time spent walking down by increments.  I ran my first 5k in September 2011.  Now I love to run and I am trying to get my endurance up to be able to run a 10k.

Do I workout EVERY SINGLE DAY?  No.  But I feel it (emotionally) when I don’t.  There are definitely days, though, that I would rather sit on my butt when I get home from work than run a few miles.  I figure as long as I’m working out more days than I am not, I’m good to go.


Where I was:  Unhealthy Food Habits
Hello, my name is E and I was a sugar addict.  Cake, brownies, pie, cookies, ice cream, doughnuts, candy, you name it...I craved it.  And why have just one when I could have a whole sleeve of Oreos? That would just be silly!

Contributing to my 30 pound weight gain was The Dirrrrty South food culture.  Here is a picture of a stand at a local festival where they are selling DEEP FRIED FRUIT. 


And that pretty much sums it up.  It also didn’t help that we were eating out four times a week.  New city=New restaurants.  New jobs=More disposable income.  A deadly combination for my waistline.

When we moved back, I took the change as an opportunity to take a good hard look at our eating habits.  The first thing I realized was that, while I didn’t have the willpower to just eat one cookie (or just one deep fried strawberry), I did have the willpower to walk past them in the store.  So I stopped buying junk food.  And since it wasn’t in the house, it wasn’t there for me to eat. Luckily, Z doesn’t have much of a sweet tooth so I didn’t have to worry about convincing him to go along with this crazy plan. Voila:  easy calories cut.

The second thing we did was to put ourselves on a budget.  We limit our restaurant spending to the point that we have whittled it down to about one meal out every month.  Then I got serious about learning to cook.  If we were going to be eating at home more often, it had better taste good.

We also started eating cleaner and more organic....but that’s a story for another day.


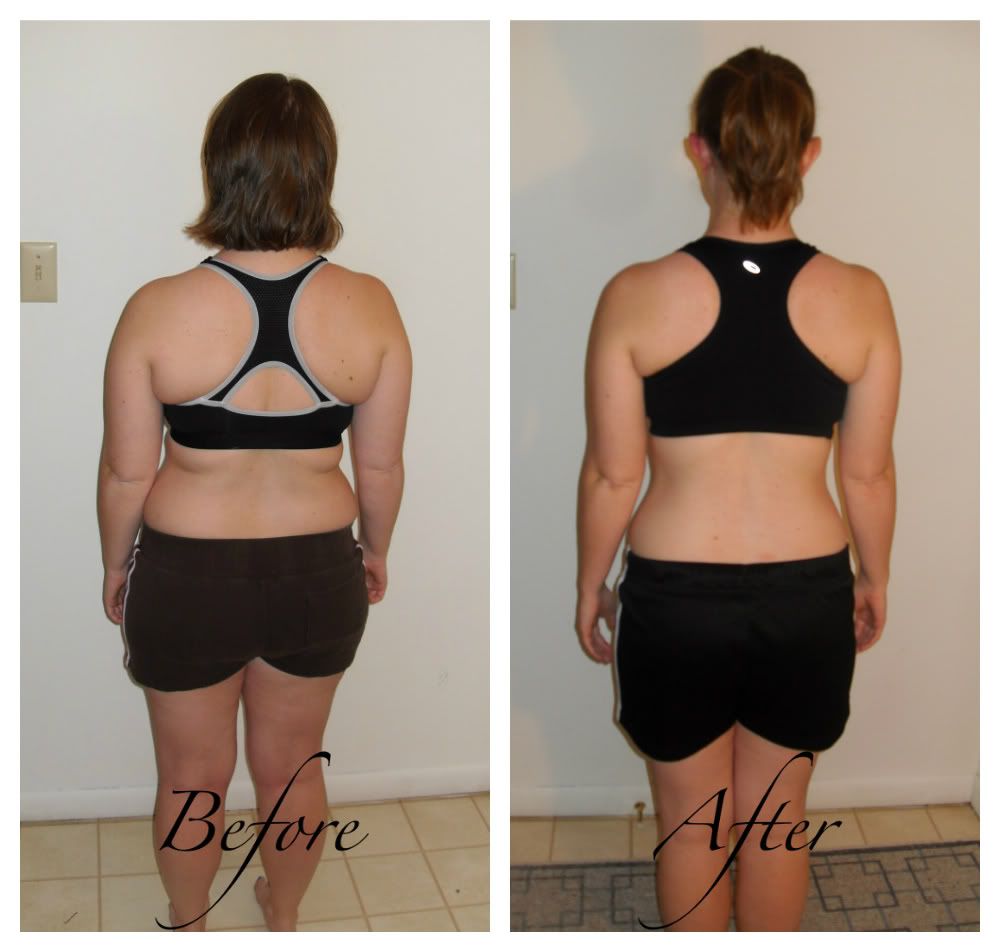
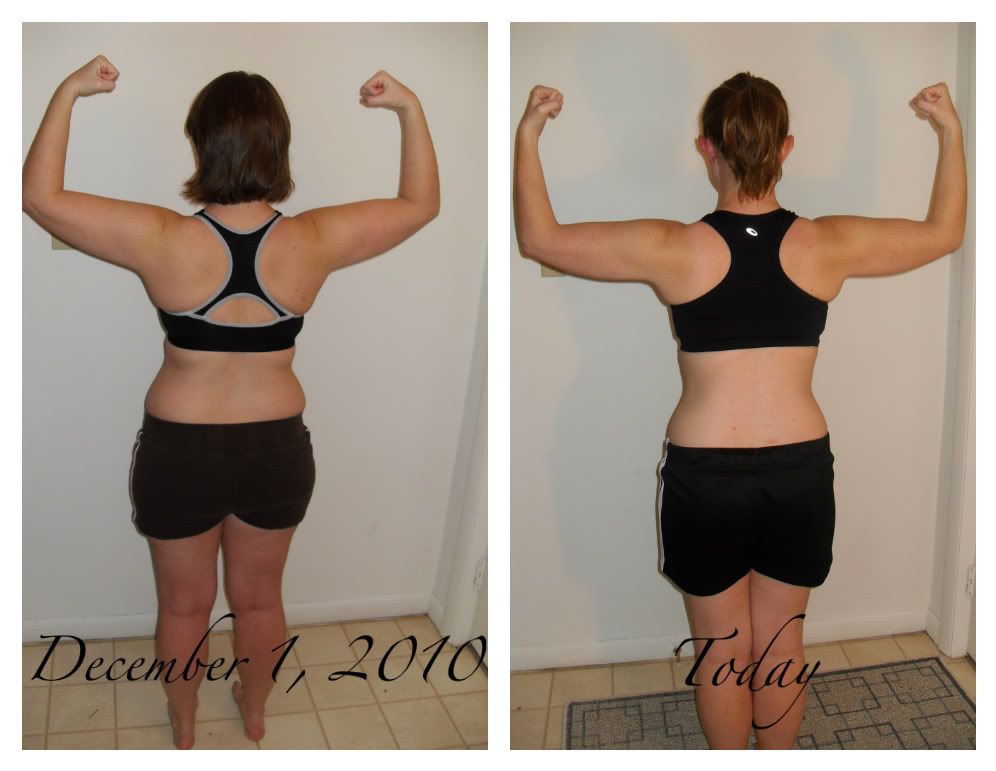
This is my story.  I feel like I have so much more to say about it, but in a nutshell...this is what works for me.  I guess what I’m trying to say is...IT IS WORKING. Without a trainer, without paying big bucks to a weight loss program, without having someone ship food to my front door.  It’s taken almost two years and it’s been very frustrating at times.  I still have goals that I want to accomplish in this arena.  But (I know...I know...everyone says this) if I can do it am doing it, so can you.

Have you had any health/weight loss successes?  Please share, I love hearing inspirational stories!